
Summary
-
Most rejections come down to details: the client's legal name or address, a missing or mistyped policy number, or the firm's own details on the letter.
-
A sent LoA can't be edited: once a Letter of Authority (LoA) is created, its details are fixed. To correct something, send a new LoA with the right details.
-
"Restart LoA" resends the same letter: use it only when nothing in the letter needs to change.
-
Your client signs again: a new LoA goes to your client for signature, the same way as the first.
Description
1. Common reasons a provider can't act on an LoA
These are the ones you can fix yourself:
-
The client's name or address doesn't match the provider's records. Providers match on the legal name and address. Use the client's full legal name, and the address the provider would have on file.
-
No policy number, or the wrong one. You can tick "I don't know the policy number", but providers find the policy more reliably when you give it. For pension policies, some providers have a known format: Timeline shows it as the example in the "Policy number" box, and shows "Policy number format is invalid" if what you type doesn't fit.
-
NEST: NEST uses the client's National Insurance number instead of a policy number.
-
Aviva policies beginning with AV: Aviva doesn't accept digital LoAs for these. Use the offline process.
-
Wrong date of birth, National Insurance number or email. The provider uses these to identify your client, and your client needs the right email to sign.
-
Your firm's details. The letter shows your firm's name, FCA number and address. If the firm name shows an adviser's own name instead, a provider may reject it.
-
The wrong LoA type. Under "Choose your Letter of Authority type", "Information only" asks for information. "Change of service" also asks the provider to make your firm the servicing agent. Pick the one you need.
-
The provider isn't supported for digital LoAs. See the list of supported providers.
2. Find out why
-
Open the client and, under Actions, click "Letters of authority".
-
Click the LoA. Its details open.
-
Read the "Details" section. For "LoA not accepted", the provider's own reason is shown there when they gave one. For "Policy not found", the provider couldn't match your client's details to a policy.
If the reason isn't clear, email support@timeline.co with the client's name and the provider, and we'll find out from the provider.
3. Correct the client's name
The first and last name on an LoA come from the client record, so you change them there.
-
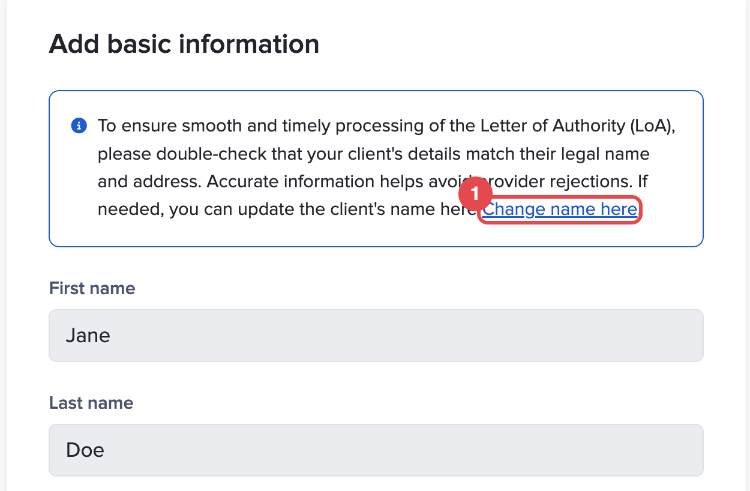
Start a new LoA (see section 5). Under "Add basic information", click the "Change name here" link.
-
Update the client's name in their client details and save.
-
Go back to the client's "Letters of authority" page and carry on with section 5.
4. Correct your firm's details
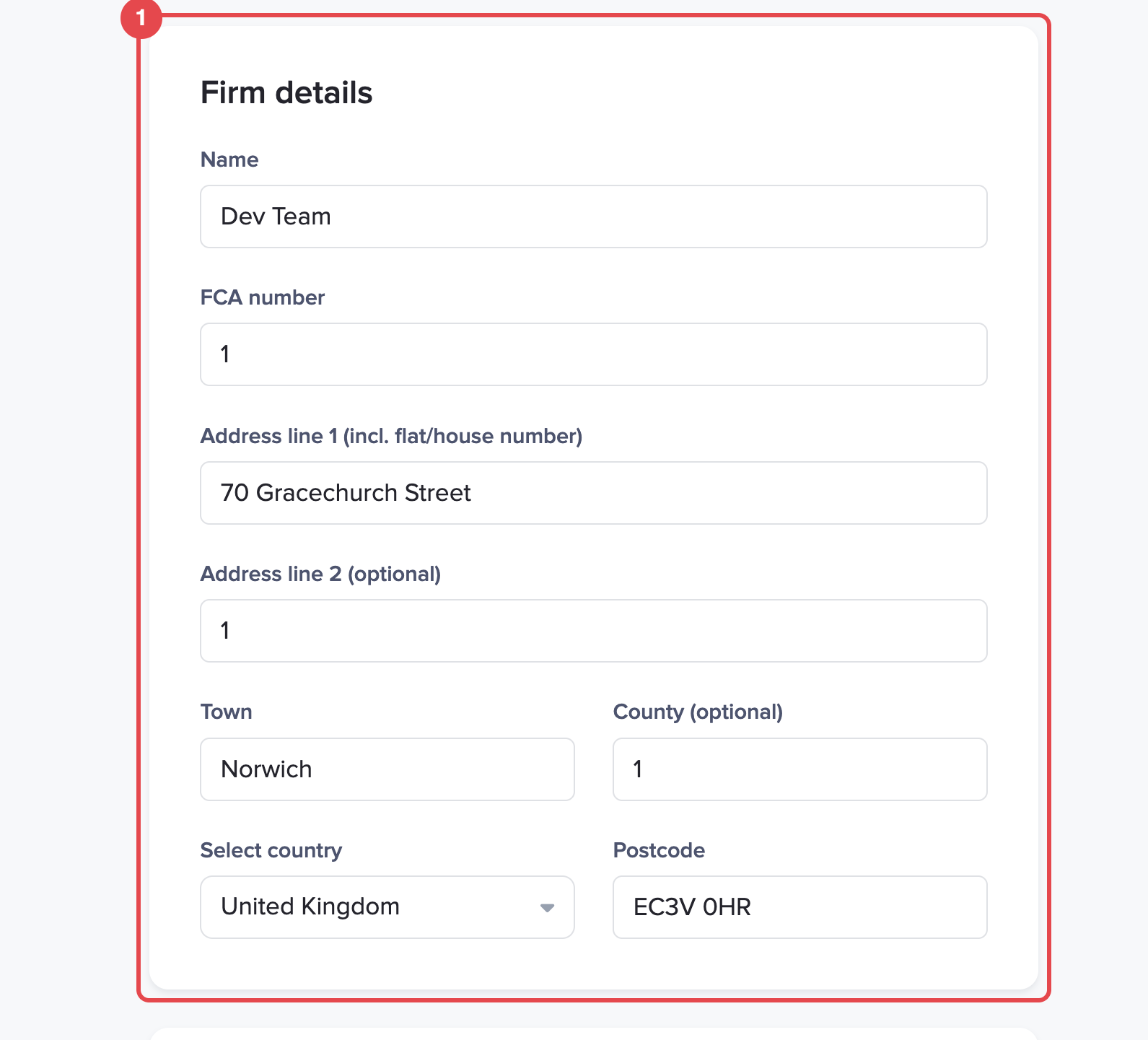
In the "Firm details" box of a new LoA, users who can manage company information can edit "Name" and "FCA number" there and then. If you can't edit them and they're incomplete, Timeline names the person in your firm who can update them in My Account > Settings > Team & Firm.
5. Send a corrected LoA
-
On the client's "Letters of authority" page, click "Send letter of authority". The LoA form opens on one page.
-
At the top, check "Firm details".
-
Under "Add basic information", check the date of birth, email, National Insurance number and address, and correct anything that's wrong. If the LoA covers a couple, check the partner's details too.
-
Check "Choose your Letter of Authority type".
-
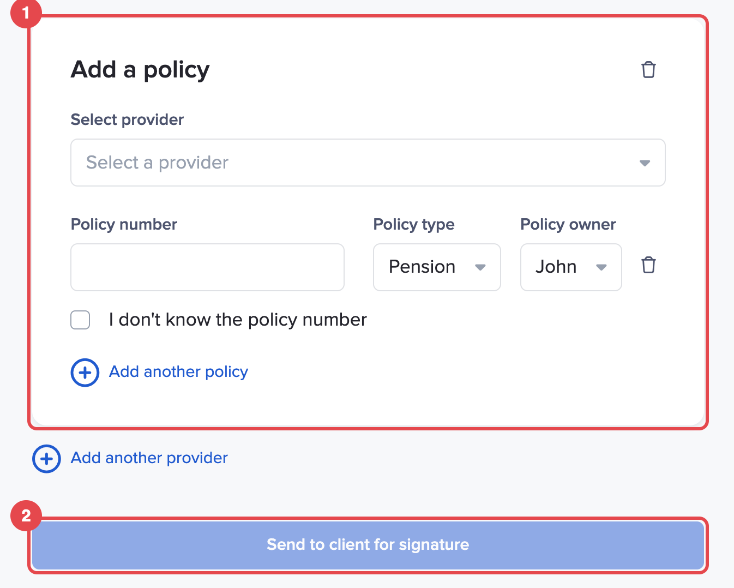
Under "Add a policy", search for the provider under "Select provider", then enter the "Policy number" and "Policy type". For a couple, also choose the "Policy owner".
-
At the bottom, click "Send to client for signature". Your client gets a new email to sign.
6. Tidy up the original LoA
You can keep the original for your records. If you don't need it:
-
Open the original LoA from the list.
-
Under "Actions", click "Delete LoA".
-
Click "Confirm delete". This can't be undone, so download anything you want to keep first.
7. When "Restart LoA" is the right choice
If the details were right and the provider asked for something outside the letter, such as ID that you've since sent them, open the LoA and click "Restart LoA", then "Confirm resend". Timeline sends the same letter again and restarts the reminders.
8. "Email already registered" or "National insurance number already registered"
If you see one of these when sending an LoA, another client record in Timeline already has that email address or National Insurance number. Email support@timeline.co with both client names and we'll help you sort it out.
Conclusion
Getting the legal name, address and policy number right first time is the single biggest thing you can do to avoid a rejection. When one does come back, a corrected LoA takes a couple of minutes and your client signs once more.
Next, read LoA statuses explained, and when to step in, the step-by-step guide and the FAQs: Letters of Authority.