
Summary
-
One place to keep facts current: Income sources, investment accounts, cash & savings, properties, mortgages, debts and spending can all be added to a plan from the Client record, and stay linked to it.
-
Change it once, every plan follows: Linked details are locked in the plan. Change them in the Client record and every plan that uses them shows the change the next time it's opened.
-
Planning choices stay in the plan: Years, growth, inflation, fees, portfolios and sale assumptions are still set in each plan.
-
Client details are shared: The plan's client and partner details are the client's own details, so a change in one place shows in the other.
-
Deleting is joined up: If you delete an item from the Client record that a plan uses, Timeline names the plan first and removes the item from it too.
Description
1. Each Client record section and the financial plan
-
Personal details: Shared. The plan's "Client details" (first and last name, email, date of birth, sex and postcode, and the partner's name, date of birth and sex) are the client's own details. When you click "Save changes" in the plan, those details update for the client too. The retirement years are set only in the plan.
-
Client circumstances: Not used by the plan. The plan's "Health status" is chosen in the plan's "Client details".
-
Investment accounts: Linked. Add them from "Existing accounts" in "Liquid assets". The name, owner and tax wrapper come from the Client record, and the balance updates automatically (see section 5).
-
Cash & Savings accounts: Linked. Add them from "Existing accounts" in "Liquid assets". The name, owner, type and balance come from the Client record (see section 6).
-
Non-liquid assets: Linked. Add properties in "Non-liquid assets". The name, owner, type and market value come from the Client record (see section 7).
-
Debts: Linked. A mortgage is linked to its property in the plan (see section 8). Loans, lines of credit, credit cards and other debts are added as life phases in "Spending" (see section 9).
-
Income sources: Linked. Add them with "From client record" in "Income sources" (see sections 2 to 4).
-
Spending: Linked. Add the client's spending as life phases with "From client record" in "Spending" (see section 10).
-
Contributions & transfers: Entered in the plan, under "Contributions & Transfers".
-
Protection: Not used by the plan.
You can still add anything manually with the "Add manually" or "Add account manually" option. A manual item belongs to that plan only.
2. Add an income source from the Client record
Before you start, the income source needs a name, an amount and an income type in the Client record. An income that belongs to the partner, or to both of them jointly, needs the partner included in the plan.
-
Open the client in Timeline and, under "Actions", click "Financial plan".
-
Click the "Settings" tab at the top of the plan.
-
In the left menu, under "Cashflow", click "Income sources".
-
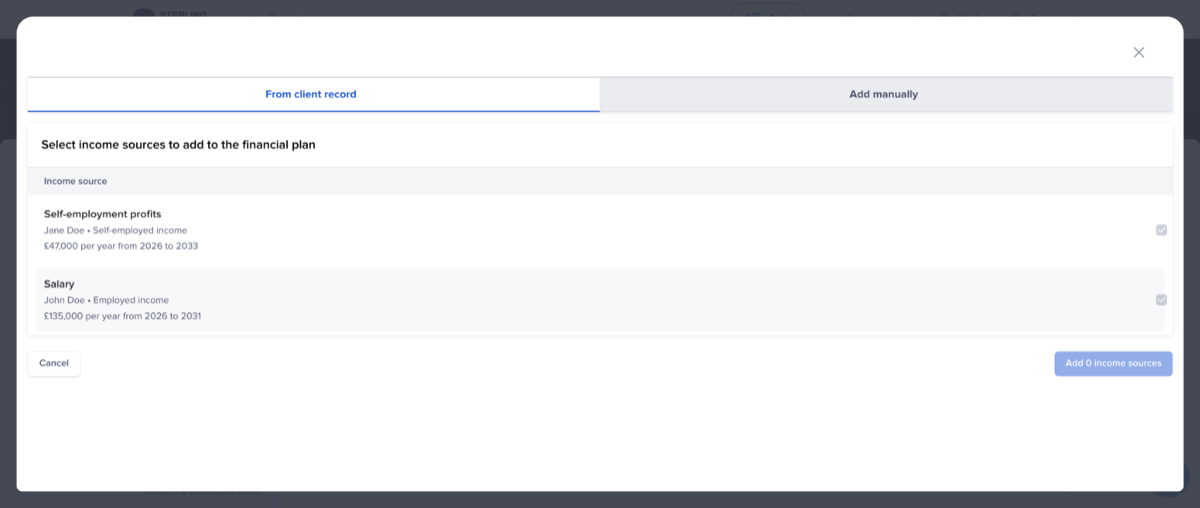
Click "Add income source". A window opens on the "From client record" tab, headed "Select income sources to add to the financial plan". It lists the household's income sources from the Client record, each with its owner, income type, yearly amount and years.
-
Tick each income source you want in the plan. An income source that's already in the plan shows as ticked and can't be added twice.
-
Click the "Add" button at the bottom right, for example "Add 2 income sources".
-
Click "Save changes".
3. When an income source can't be added
An income source that can't be added is greyed out, with the reason underneath:
-
"Add the amount in the client record": the income source has no yearly amount.
-
"Add a name in the client record": the income source has no name.
-
"Add the income type in the client record": the income source has no type, such as salary or DB pension.
-
"Include the partner in this plan to add it": the income belongs to the partner, or is joint, and the plan doesn't include the partner. Under "Client details", answer "Yes" to "Does the client have a partner?".
If the client has no income sources yet, the window shows "No income sources in the client record yet." Click "Add them in the client record" to open the Client record in a new tab.
4. What a linked income source looks like in the plan
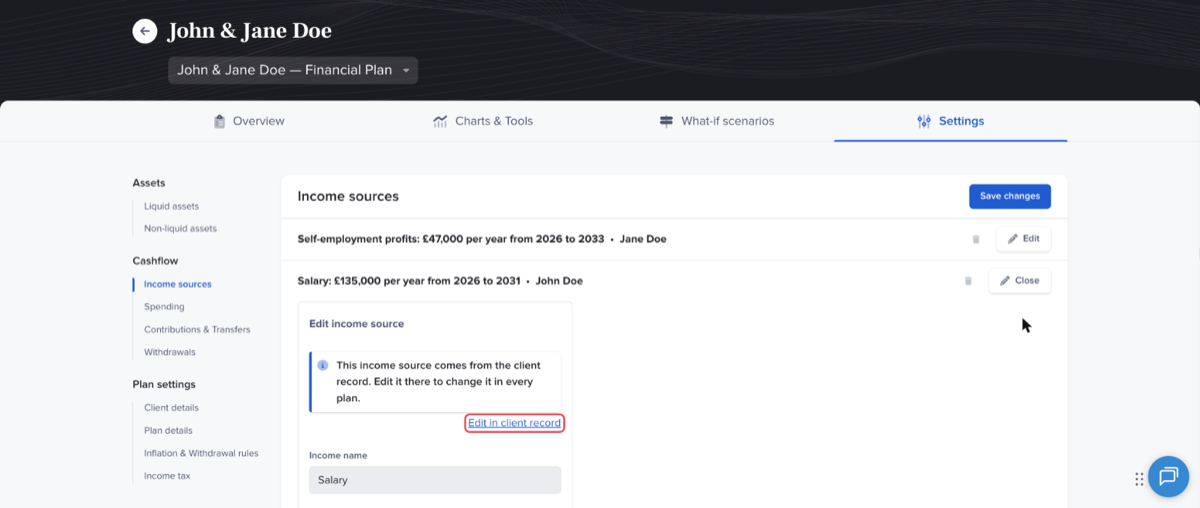
Click "Edit" on a linked income source. A note at the top reads "This income source comes from the client record. Edit it there to change it in every plan."
-
Locked fields: "Income name", the owner, the income type, "Income per year (gross)", the inflation adjustment, "From year" and "To year".
-
Where to change them: Click "Edit in client record". The Client record opens in a new tab.
-
Joint income: A joint income in the Client record, such as rent from a jointly owned property, stays joint in the plan.
-
Removing it from the plan: Click the bin icon, or "Delete" inside the income source. This removes it from this plan only. The Client record keeps it.
5. Add an investment account with a live balance
-
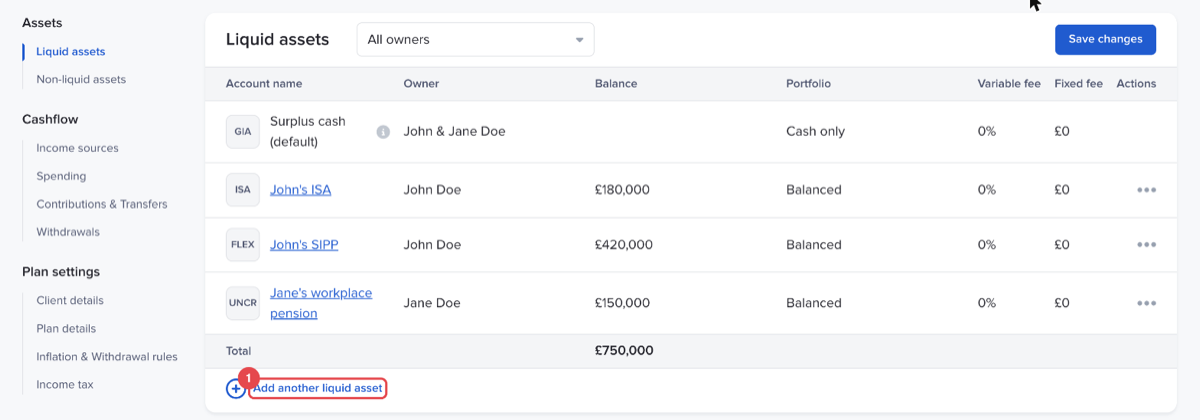
In the plan's "Settings" tab, under "Assets", click "Liquid assets".
-
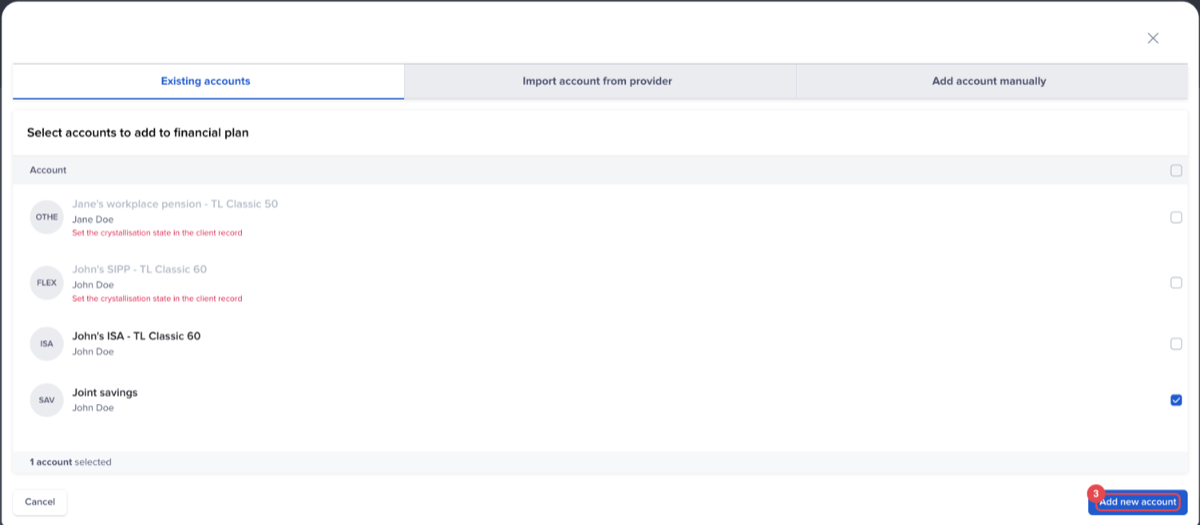
Click "Add another liquid asset". A window opens with three tabs: "Existing accounts", "Import account from provider" and "Add account manually".
-
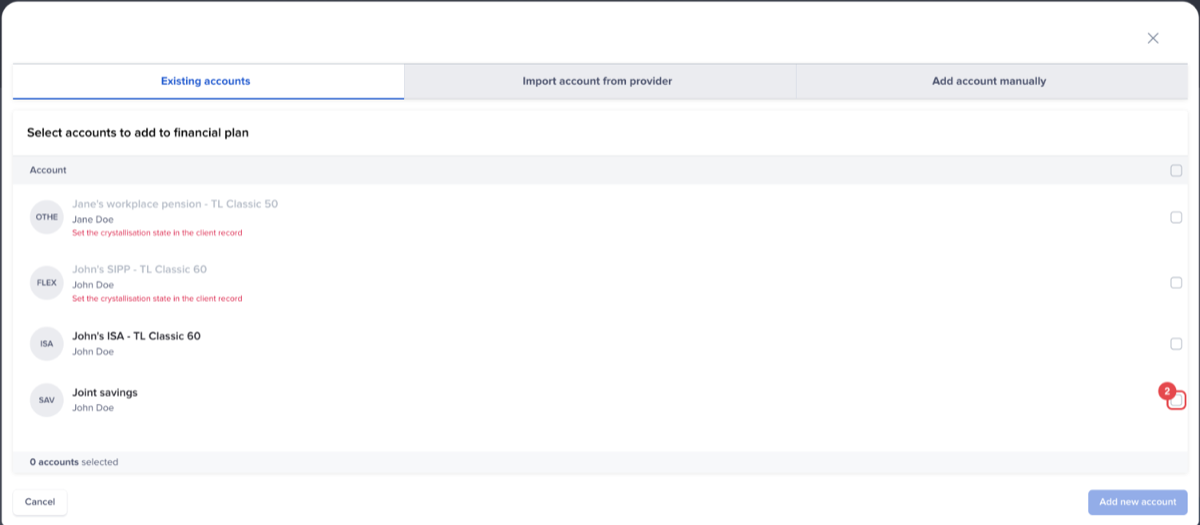
On "Existing accounts", tick the accounts you want. The list shows the household's investment accounts and cash & savings accounts from the Client record, including Timeline Platform accounts.
-
Click "Add new account", then "Save changes".
A linked account shows "This account comes from the client record. Edit it there to change it in every plan." with an "Edit in client record" link.
-
Locked: the name, owner and tax wrapper.
-
Live balance: with "Use auto-updates for this account?" set to "Yes", the balance and model portfolio update automatically and can't be typed over. Choose "No" to enter your own.
-
Set in the plan: fees and tax assumptions.
A pension needs its crystallisation state in the Client record ("Uncrystallised" or "Flexi-access drawdown") before it can be added. The plan uses it as the account's tax type. A partly crystallised pension is recorded as two accounts.
An account that can't be added is greyed out with the reason, for example:
-
"Include the partner in this plan to add it"
-
"Set the crystallisation state in the client record"
-
"Not supported yet: owned by someone other than the client or partner"
-
"This account has a negative balance."
6. Add a cash & savings account
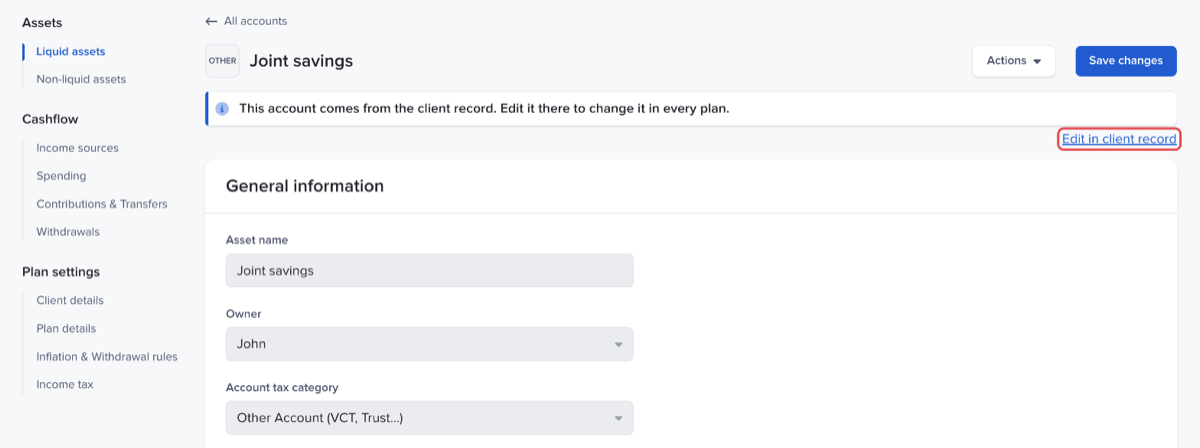
Cash & savings accounts are on the same "Existing accounts" tab as investment accounts, marked with their type (current, savings, cash ISA or cash) and owner. Tick them and click "Add new account".
-
Locked: the name, owner, tax category, tax wrapper and balance.
-
Set in the plan: the portfolio, fees and withdrawal settings.
-
Joint accounts: a joint account counts as the main client's in the plan.
An account that can't be added shows why: "Add the account type in the client record", "Add the balance in the client record" or "This account has a negative balance."
7. Add a property
-
In the plan's "Settings" tab, under "Assets", click "Non-liquid assets".
-
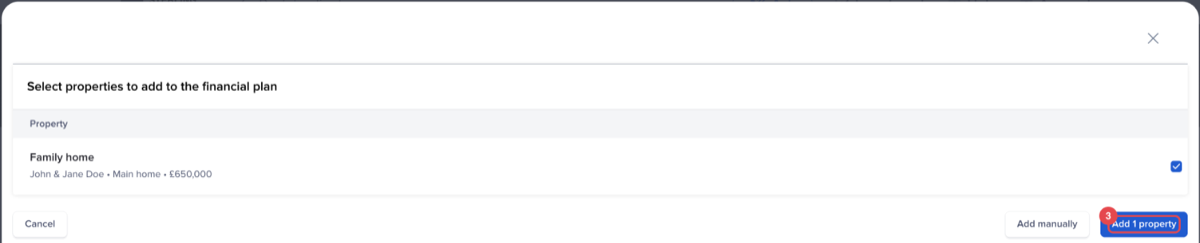
Click "Add another asset". A window opens headed "Select properties to add to the financial plan".

-
Tick the properties you want and click "Add", for example "Add 1 property".
-
Click "Save changes".
In the plan's "Non-liquid assets" list, a linked property has a "Client record" label next to its name.

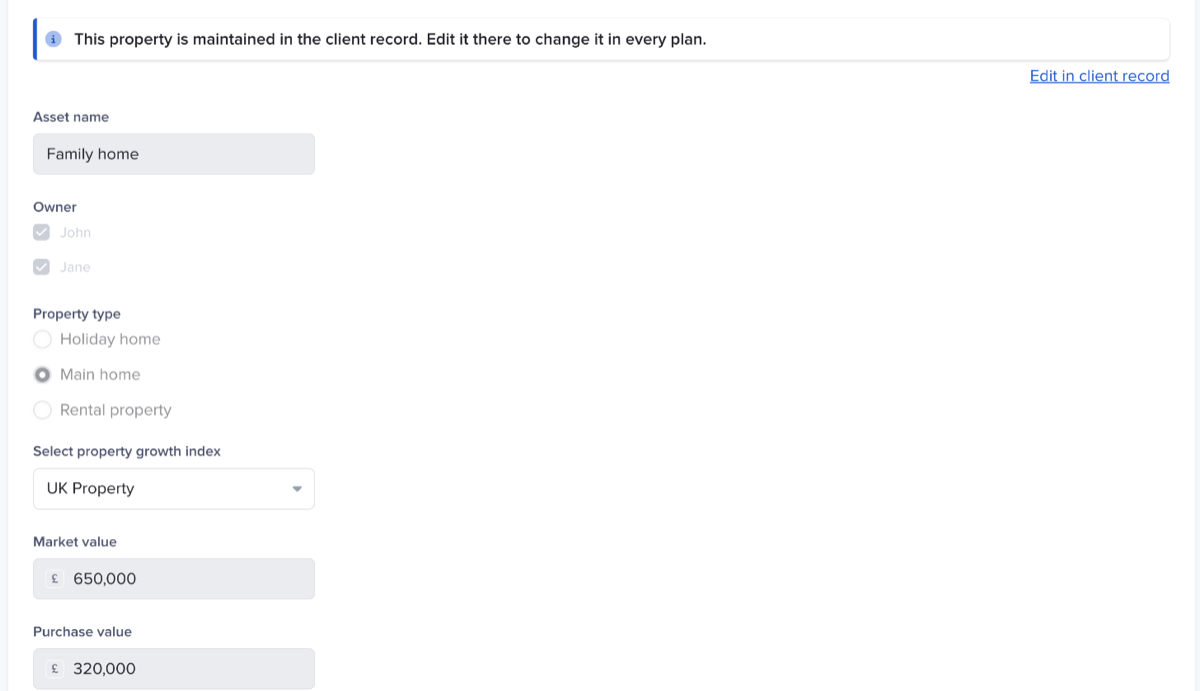
Open it and it shows "This property is maintained in the client record. Edit it there to change it in every plan."
-
Locked: the name, owner, property type, market value and purchase value.
-
Set in the plan: the property growth index and "Would you like to sell this property?", with the sale details.
A property that can't be added shows why, for example "Missing usage in the client record", "Missing market value in the client record" or "Already in this plan". If the client has no properties yet, the window shows "No properties in the client record yet." with a link to add them.
8. Link a mortgage to a property
A mortgage comes into the plan with its property. In the "Add another asset" window, a property with a mortgage shows "+ mortgage" and the mortgage's name. If the property has more than one mortgage, pick one on the property page:
-
Open the property in the plan.
-
Click "Link mortgage".
-
Choose the mortgage under "Pick the mortgage to link to this property."
-
Click "Save changes".
A linked mortgage is fully locked: balance, interest rate, monthly payment, term and type all come from the Client record. A property holds one mortgage in the plan. To stop using it, open "Actions" and click "Unlink mortgage".
A mortgage can't be linked until the Client record has its type, remaining amount, interest rate, monthly cost and term. The plan names whichever is missing.
9. Add loans, credit cards and other debts
Debts other than mortgages reduce the client's cashflow as life phases.
-
In the plan's "Settings" tab, under "Cashflow", click "Spending".
-
Click "Add a life phase" and stay on the "From client record" tab.
-
Under "Select debts to add to the financial plan as life phases", tick the debts you want. Each shows its type, owner, yearly amount and years.
-
Click "Add", for example "Add 2 debts", then "Save changes".
Each debt becomes a life phase of its monthly cost times 12, from this year until the year it's paid off. The name, years and amount are locked to the Client record, and the debt affects cashflow only, not net worth.
A debt that can't be added shows why: "Interest-only debts are not supported yet", "Missing monthly cost in the client record" or "This monthly cost never pays the debt off".
To change the figures for this plan only, click "Duplicate life phase". The copy, with "(Copy)" after its name, is a manual life phase you can edit.
10. Add the client's spending
-
In the plan's "Settings" tab, under "Cashflow", click "Spending".
-
Click "Add a life phase" and stay on the "From client record" tab.
-
Under "Spending to add", choose one:
-
"General spending": one life phase for the household's single monthly figure, named after the household, for example "Ann & Bob spending".
-
"Detailed spending": one life phase for each spending category with an amount: Housing, Transportation, Personal, Utilities, Family and dependants, and Health.
-
Click "Add", then "Save changes".
The spending runs from this year onwards. The name and amount are locked to the Client record. You can change the years and inflation in the plan. A plan uses either the general figure or the detailed breakdown, not both: to switch, delete the one you have first.
Each linked life phase shows a "Client record" label with a "Change in client record" link that opens the Client record's Spending section in a new tab.
11. When you delete a linked item from the Client record
Before you confirm, the delete window names each plan that uses the item and tells you it will be removed from the plan too.
-
Investment account: "It will be deleted from the plan too, along with its contributions and withdrawals."
-
Income source: removed from the plan, with the contributions it funds.
-
Property: removed from the plan, with its mortgage.
-
Debt: removed from the plan.
-
Mortgage removed from a property: a "Remove mortgage" window names the plan, and saving removes the mortgage from it.
If a linked item can't be read from the Client record any more, for example a cash & savings account that was deleted, the plan marks it "Removed from client record" and keeps its last values until you delete it from the plan.
If an item becomes the partner's or joint in the Client record and the plan doesn't include the partner, the plan marks it "Partner's in client record" and keeps its last values under the client until you include the partner or delete it.
12. When you duplicate a plan
-
Income sources, cash & savings accounts and properties: Items linked to the Client record stay linked in the copy and keep following the record.
-
Investment accounts: The copy keeps each account with its balance on the day you duplicate, but the balance no longer updates automatically. To get a live balance in the copy, delete the account and add it again from "Existing accounts".
Example
Ann and Bob's adviser adds their salaries, their ISA, a cash ISA, their home with its mortgage, a car loan and their detailed spending to the plan from the Client record. Six months later, Ann's annual review FactFind updates her salary and shows the car loan paid off. The adviser opens the plan: the salary is already the new figure, and the car loan's life phase has gone, without retyping anything.
Conclusion
The financial plan takes the client's facts from the Client record, so you keep income, balances, property, debts and spending current in one place and every plan follows. The plan keeps what's genuinely a planning choice: years, growth, inflation, fees and sale assumptions.
Related: Keep every client fact in one place with the Client record · Record a client's wealth in the Client record · Create a financial plan, step by step · Understanding Planned Spending, Income Sources, and Withdrawals in Timeline Planning